How to Set Up Google Ads MCP for Any AI Agent
Connect Google Ads to AI tools like Gemini CLI, Claude Code, Cursor, or VS Code using Google’s official Google Ads MCP server.

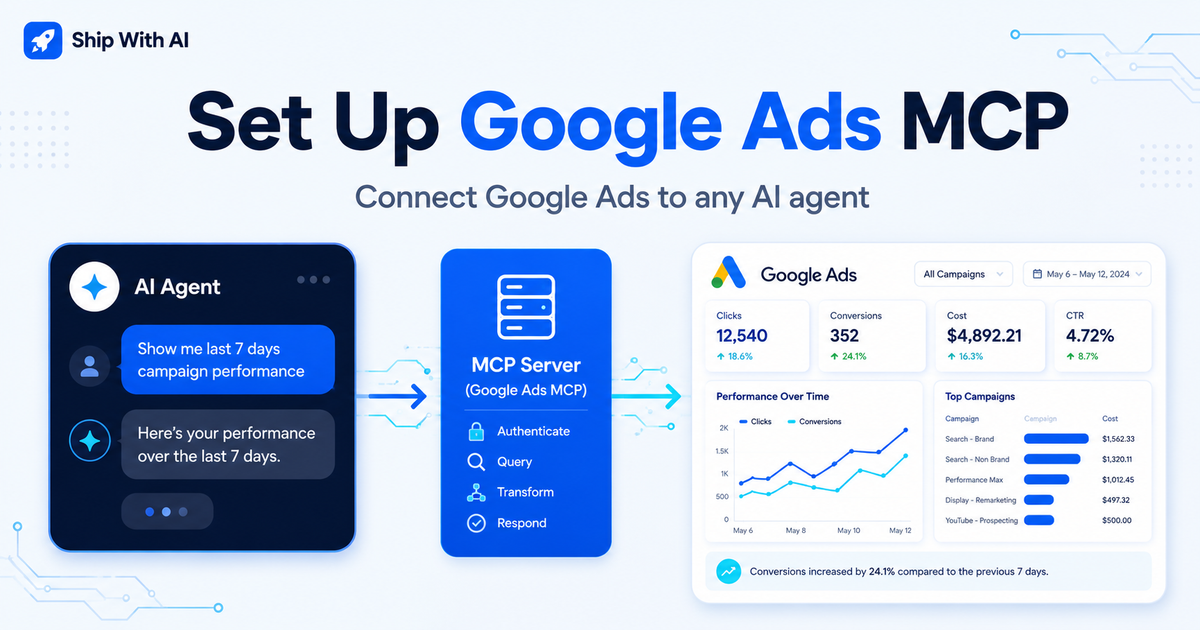
AI agents are becoming much more useful when they can connect directly to real tools and data. One setup I wanted to test is connecting an AI assistant to Google Ads, so I can ask natural language questions like:
How is my campaign performance this week?
or:
Show me my top spending campaigns from the last 7 days.
Google now has an official Google Ads MCP server that lets MCP-compatible AI tools connect to the Google Ads API. MCP stands for Model Context Protocol, an open standard that allows LLMs to securely interact with external data and applications. Google’s MCP server acts as a bridge between an AI agent and the Google Ads API, mainly for campaign analysis and reporting. (Google for Developers)
In this post, I’ll walk through how to set it up for any AI tool that supports MCP, including Gemini CLI, Claude Code, Cursor, and VS Code.
What you are building
You are setting up this flow:
AI Agent
   ↓
MCP Client
   ↓
Google Ads MCP Server
   ↓
Google Ads API
   ↓
Your Google Ads account data
The nice thing is you do not need to write your own custom integration for authentication, fetching Google Ads resources, or parsing API responses. Google says the MCP server removes the need for that kind of custom “glue code” by exposing tools that an LLM can discover and call. (Google for Developers)
At the moment, the official implementation is read-only. That means it can retrieve and analyze data, but it cannot modify bids, pause campaigns, or create new ads. (Google for Developers)
What the Google Ads MCP server can do
The official repo exposes tools for:
search
get_resource_metadata
list_accessible_customers
The search tool retrieves Google Ads account information, get_resource_metadata helps the AI understand fields available for resources like campaigns, and list_accessible_customers returns the customer IDs available to the authenticated user. (GitHub)
It also provides resources like:
discovery-document
metrics
segments
release-notes
These help the host AI understand the Google Ads API surface, available metrics, available segments, and latest release notes. (GitHub)
Prerequisites
Before you configure the MCP server, you need a few things.
1. Python
2. pipx
3. Google Cloud project ID
4. Google Ads developer token
5. Google Ads API enabled in your Google Cloud project
6. OAuth credentials or Application Default Credentials
7. An MCP-compatible AI client
Google’s docs say you need a developer token, Google Cloud project ID, and OAuth credentials or application default credentials before configuration. (Google for Developers)
The GitHub repo setup also lists the main steps as configuring Python, configuring a developer token, enabling APIs, configuring credentials, and then configuring your MCP client. (GitHub)
Step 1: Install pipx
Google’s GitHub setup recommends installing pipx first. (GitHub)
On macOS, you can usually install it with:
brew install pipx
pipx ensurepath
Then restart your terminal and check:
pipx --version
Step 2: Get your Google Ads developer token
You need a Google Ads developer token from the Google Ads API Center.
Google notes that the token needs at least Explorer access to query production accounts. If you see an error saying your developer token is only approved for test accounts, your token does not yet have the production access level you need. (GitHub)
You will use this later as:
GOOGLE_ADS_DEVELOPER_TOKEN
Step 3: Enable the Google Ads API
In your Google Cloud project, enable the Google Ads API.
The GitHub setup specifically says to enable the Google Ads API in your Google Cloud project. (GitHub)
You will also need your project ID:
GOOGLE_PROJECT_ID
Step 4: Configure credentials
There are a few ways to authenticate. The simplest local developer setup is usually Application Default Credentials.
Google’s repo says your credentials need the Google Ads API scope:
https://www.googleapis.com/auth/adwords
(GitHub)
A useful command is:
gcloud auth application-default login \
  --scopes https://www.googleapis.com/auth/adwords,https://www.googleapis.com/auth/cloud-platform \
  --client-id-file=YOUR_CLIENT_JSON_FILE
After this command finishes, Google says it prints the path where your credentials were saved. You need that path for the MCP config. (GitHub)
It will look something like:
Credentials saved to file: /path/to/application_default_credentials.json
Save that path. You will use it as:
GOOGLE_APPLICATION_CREDENTIALS
Step 5: Add the MCP server to your AI client
Here is the generic MCP config.
This format works across MCP clients. The official repo says the same mcpServers block can be added to clients like Claude Code, Cursor, and VS Code, using each client’s own settings file location. (GitHub)
{
  "mcpServers": {
    "google-ads-mcp": {
      "command": "pipx",
      "args": [
        "run",
        "--spec",
        "git+https://github.com/googleads/google-ads-mcp.git",
        "google-ads-mcp"
      ],
      "env": {
        "GOOGLE_APPLICATION_CREDENTIALS": "PATH_TO_CREDENTIALS_JSON",
        "GOOGLE_PROJECT_ID": "YOUR_PROJECT_ID",
        "GOOGLE_ADS_DEVELOPER_TOKEN": "YOUR_DEVELOPER_TOKEN"
      }
    }
  }
}
Replace these values:
PATH_TO_CREDENTIALS_JSON = path from gcloud auth application-default login
YOUR_PROJECT_ID = your Google Cloud project ID
YOUR_DEVELOPER_TOKEN = your Google Ads API developer token
Example: Gemini CLI
For Gemini CLI, Google’s repo says to create or edit:
~/.gemini/settings.json
Then add the MCP server block. (GitHub)
{
  "mcpServers": {
    "google-ads-mcp": {
      "command": "pipx",
      "args": [
        "run",
        "--spec",
        "git+https://github.com/googleads/google-ads-mcp.git",
        "google-ads-mcp"
      ],
      "env": {
        "GOOGLE_APPLICATION_CREDENTIALS": "/Users/yourname/.config/gcloud/application_default_credentials.json",
        "GOOGLE_PROJECT_ID": "your-google-cloud-project-id",
        "GOOGLE_ADS_DEVELOPER_TOKEN": "your-google-ads-developer-token"
      }
    }
  }
}
Then restart Gemini CLI.
Example: Claude Code
For Claude Code, add the same block to:
~/.claude/settings.json
Google’s repo lists ~/.claude/settings.json as the example location for Claude Code. (GitHub)
{
  "mcpServers": {
    "google-ads-mcp": {
      "command": "pipx",
      "args": [
        "run",
        "--spec",
        "git+https://github.com/googleads/google-ads-mcp.git",
        "google-ads-mcp"
      ],
      "env": {
        "GOOGLE_APPLICATION_CREDENTIALS": "/path/to/application_default_credentials.json",
        "GOOGLE_PROJECT_ID": "your-google-cloud-project-id",
        "GOOGLE_ADS_DEVELOPER_TOKEN": "your-google-ads-developer-token"
      }
    }
  }
}
Example: Cursor
For Cursor, add the same MCP server config to:
.cursor/mcp.json
Google’s repo gives .cursor/mcp.json as the example file for Cursor. (GitHub)
{
  "mcpServers": {
    "google-ads-mcp": {
      "command": "pipx",
      "args": [
        "run",
        "--spec",
        "git+https://github.com/googleads/google-ads-mcp.git",
        "google-ads-mcp"
      ],
      "env": {
        "GOOGLE_APPLICATION_CREDENTIALS": "/path/to/application_default_credentials.json",
        "GOOGLE_PROJECT_ID": "your-google-cloud-project-id",
        "GOOGLE_ADS_DEVELOPER_TOKEN": "your-google-ads-developer-token"
      }
    }
  }
}
Example: VS Code
For VS Code with Copilot MCP support, Google’s repo lists:
.vscode/mcp.json
as the example config location. (GitHub)
{
  "mcpServers": {
    "google-ads-mcp": {
      "command": "pipx",
      "args": [
        "run",
        "--spec",
        "git+https://github.com/googleads/google-ads-mcp.git",
        "google-ads-mcp"
      ],
      "env": {
        "GOOGLE_APPLICATION_CREDENTIALS": "/path/to/application_default_credentials.json",
        "GOOGLE_PROJECT_ID": "your-google-cloud-project-id",
        "GOOGLE_ADS_DEVELOPER_TOKEN": "your-google-ads-developer-token"
      }
    }
  }
}
If you use a manager account
If your Google Ads access goes through a manager account, you may need to add:
"GOOGLE_ADS_LOGIN_CUSTOMER_ID": "YOUR_MANAGER_CUSTOMER_ID"
Google’s repo says this is needed when your access to a customer account is through a manager account. (GitHub)
Full example:
{
  "mcpServers": {
    "google-ads-mcp": {
      "command": "pipx",
      "args": [
        "run",
        "--spec",
        "git+https://github.com/googleads/google-ads-mcp.git",
        "google-ads-mcp"
      ],
      "env": {
        "GOOGLE_APPLICATION_CREDENTIALS": "PATH_TO_CREDENTIALS_JSON",
        "GOOGLE_PROJECT_ID": "YOUR_PROJECT_ID",
        "GOOGLE_ADS_DEVELOPER_TOKEN": "YOUR_DEVELOPER_TOKEN",
        "GOOGLE_ADS_LOGIN_CUSTOMER_ID": "YOUR_MANAGER_CUSTOMER_ID"
      }
    }
  }
}
Step 6: Test it
Restart your AI client and ask:
What can the google-ads-mcp server do?
Then try:
What customers do I have access to?
Google’s docs suggest these same kinds of starter prompts, including asking what the server can do, what customers are available, and how campaign performance looks this week. (Google for Developers)
Once you know your customer ID, ask:
How many active campaigns do I have for customer id 1234567890?
or:
Give me a report of the top spending campaigns split by device category over the last 7 days for account 1234567890.
Google’s docs also note that your agent will need a customer ID for most prompts, so including it directly in the prompt can make things easier. (GitHub)
Recommended Google Cloud setup: Build and push a Docker image
If you want to use the Google Ads MCP server with multiple AI agents, or you do not want to run it locally on your laptop, the better setup is to deploy it to Google Cloud Run.
Google recommends building the MCP server into a Docker image and pushing it to Artifact Registry. You can do this with Cloud Build, so you do not need Docker installed locally. (Google for Developers)
First, set your active Google Cloud project:
gcloud config set project YOUR_PROJECT_ID
Then create an Artifact Registry repository for your MCP server images:
gcloud artifacts repositories create mcp-servers \
  --repository-format=docker \
  --location=us-central1
Next, build and push the Docker image using Cloud Build:
gcloud builds submit \
  --tag us-central1-docker.pkg.dev/YOUR_PROJECT_ID/mcp-servers/google-ads-mcp:latest .
Replace:
YOUR_PROJECT_ID
with your real Google Cloud project ID: for example like project-mcp-ads
This command builds the Docker image from the current project folder and pushes it to Artifact Registry. Google notes that you need to repeat this step whenever you want to update the deployed MCP server to the latest version. (Google for Developers)
After the image is pushed, deploy it to Cloud Run:
gcloud run deploy google-ads-mcp \
  --image us-central1-docker.pkg.dev/YOUR_PROJECT_ID/mcp-servers/google-ads-mcp:latest \
  --platform managed \
  --region us-central1 \
  --allow-unauthenticated \
  --set-env-vars="GOOGLE_PROJECT_ID=YOUR_PROJECT_ID,GOOGLE_ADS_DEVELOPER_TOKEN=YOUR_DEVELOPER_TOKEN,GOOGLE_ADS_MCP_OAUTH_CLIENT_ID=YOUR_CLIENT_ID,GOOGLE_ADS_MCP_OAUTH_CLIENT_SECRET=YOUR_CLIENT_SECRET,GOOGLE_ADS_MCP_BASE_URL=YOUR_BASE_URL,FASTMCP_HOST=0.0.0.0"
For Cloud Run, Google lists these required environment variables:
GOOGLE_PROJECT_ID
GOOGLE_ADS_DEVELOPER_TOKEN
GOOGLE_ADS_MCP_OAUTH_CLIENT_ID
GOOGLE_ADS_MCP_OAUTH_CLIENT_SECRET
GOOGLE_ADS_MCP_BASE_URL
FASTMCP_HOST
FASTMCP_HOST should be set to:
0.0.0.0
so the MCP server can accept incoming connections inside Cloud Run. (Google for Developers)
One thing to know: when you first deploy, you may not know your final Cloud Run URL yet. Google notes that GOOGLE_ADS_MCP_BASE_URL is assigned by Cloud Run after the first deployment, so you can update the environment variables after you get the deployed URL. (Google for Developers)
Once Cloud Run gives you a URL, configure your MCP client like this:
{
  "mcpServers": {
    "google-ads-mcp": {
      "httpUrl": "https://your-cloud-run-url.a.run.app/mcp"
    }
  }
}
This is the cleaner setup if you want the MCP server to be shared across different tools, for example Gemini CLI, Claude Code, Cursor, VS Code, or your own AI agent.
My recommendation:
Use local pipx setup for testing.
Use Cloud Run + Docker image when you want a stable shared server.
Also note that the Google Ads MCP GitHub repo says the Google Cloud deployment path supports authentication using an OAuth Client ID and Client Secret through the OAuth proxy. (GitHub)
What I would use this for
This setup is useful for quick reporting and diagnostics.
For example:
Show me campaigns with high spend and low conversions this week.
Which campaigns changed the most compared to last week?
List my active campaigns and their cost, clicks, conversions, and CPA.
Which device category is spending the most?
What campaign should I investigate first?
Because the server is read-only, I like this setup as an analysis layer, not an automation layer. It is great for asking questions, checking performance, and exploring account data without writing GAQL manually every time.
Result: Testing Google Ads MCP with Claude
Now, let’s see the result when using the Google Ads MCP server with Claude.
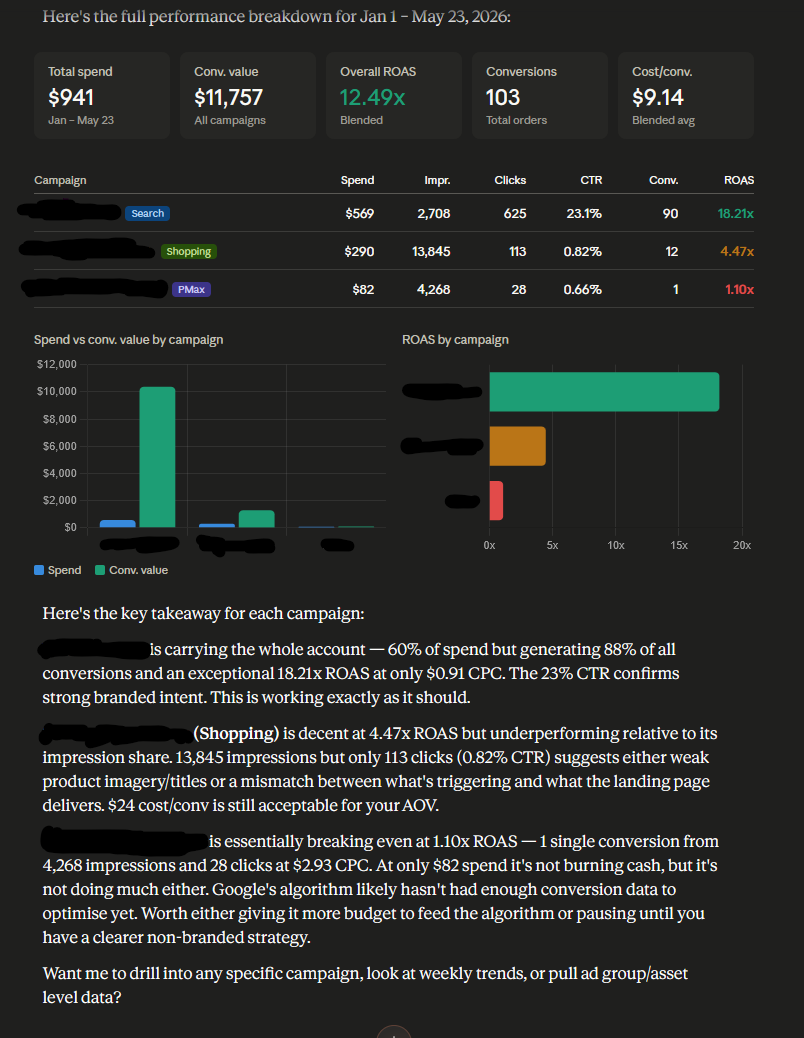
After the MCP server is configured, Claude can access Google Ads through the connected MCP tool. I can ask questions, such as checking accessible accounts, reviewing campaign performance, or summarizing metrics from the last 7 days.
In my test, Claude was able to call the Google Ads MCP server and return useful campaign data without me writing GAQL manually.
Since the current server is read-only, this setup is best for analysis and reporting. It lets Claude inspect Google Ads performance safely without making changes to campaigns, ads, or bids.
Common issues
The server does not show up
Check that your config file is in the correct location for your AI client.
Also check that pipx works:
pipx --version
Authentication fails
Check that:
GOOGLE_APPLICATION_CREDENTIALS
points to the real credentials JSON file.
Also confirm your credentials include:
https://www.googleapis.com/auth/adwords
Google’s repo specifically says this scope is required for the credentials. (GitHub)
You cannot query production accounts
Your developer token may not have the required access level. Google’s repo says the token needs at least Explorer access to query production accounts. (GitHub)
The AI asks for a customer ID
That is normal. The repo notes that the agent will need a customer ID for most prompts. (GitHub)
Use:
What customers do I have access to?
Then copy the customer ID into your next prompt.
Local vs Cloud Run
For personal use, I would start with the local pipx setup.
Google also documents deploying the MCP server to Google Cloud Run or other cloud infrastructure if you want to share the server across different agents or run it as a web service. (Google for Developers)
For most developers, local is simpler:
Local setup = best for testing and personal use
Cloud Run setup = better for teams, hosted agents, or shared access
Final thoughts
The Google Ads MCP server is a good example of where AI tooling is going.
Instead of exporting reports, writing custom scripts, or manually building dashboards, you can connect your AI tool directly to the Google Ads API and ask questions in natural language.
The important thing to remember: this is currently read-only. That is actually a good thing for a first setup. You can explore and analyze campaign data without worrying that the AI will accidentally change bids or pause campaigns.
For my own workflow, I would use this for:
weekly campaign summaries
quick performance checks
finding high-spend low-result campaigns
understanding account structure
exploring Google Ads data without writing GAQL manually
If you work with Google Ads and use AI coding tools already, this is worth setting up.